food

A Valentines Treat: Oreo© Cheesecake Cookies

My Pinterest SWEETS board is quickly filling up with an abundance of cookie + pie recipes and when I saw this one, I thought, 'What a cute idea for Valentines Day!' The original recipe is from Blogger 'Baker by Nature.' It may be one of the easiest cookie recipes I've ever followed and with only five ingredients, how could it not be?! Another Blogger, 'Nest of Posies' took it one step farther and added some red food coloring to hers, making the cookies festive and pink. With a total of six ingredients, you'll be able to whip these cute cookies up in no time!
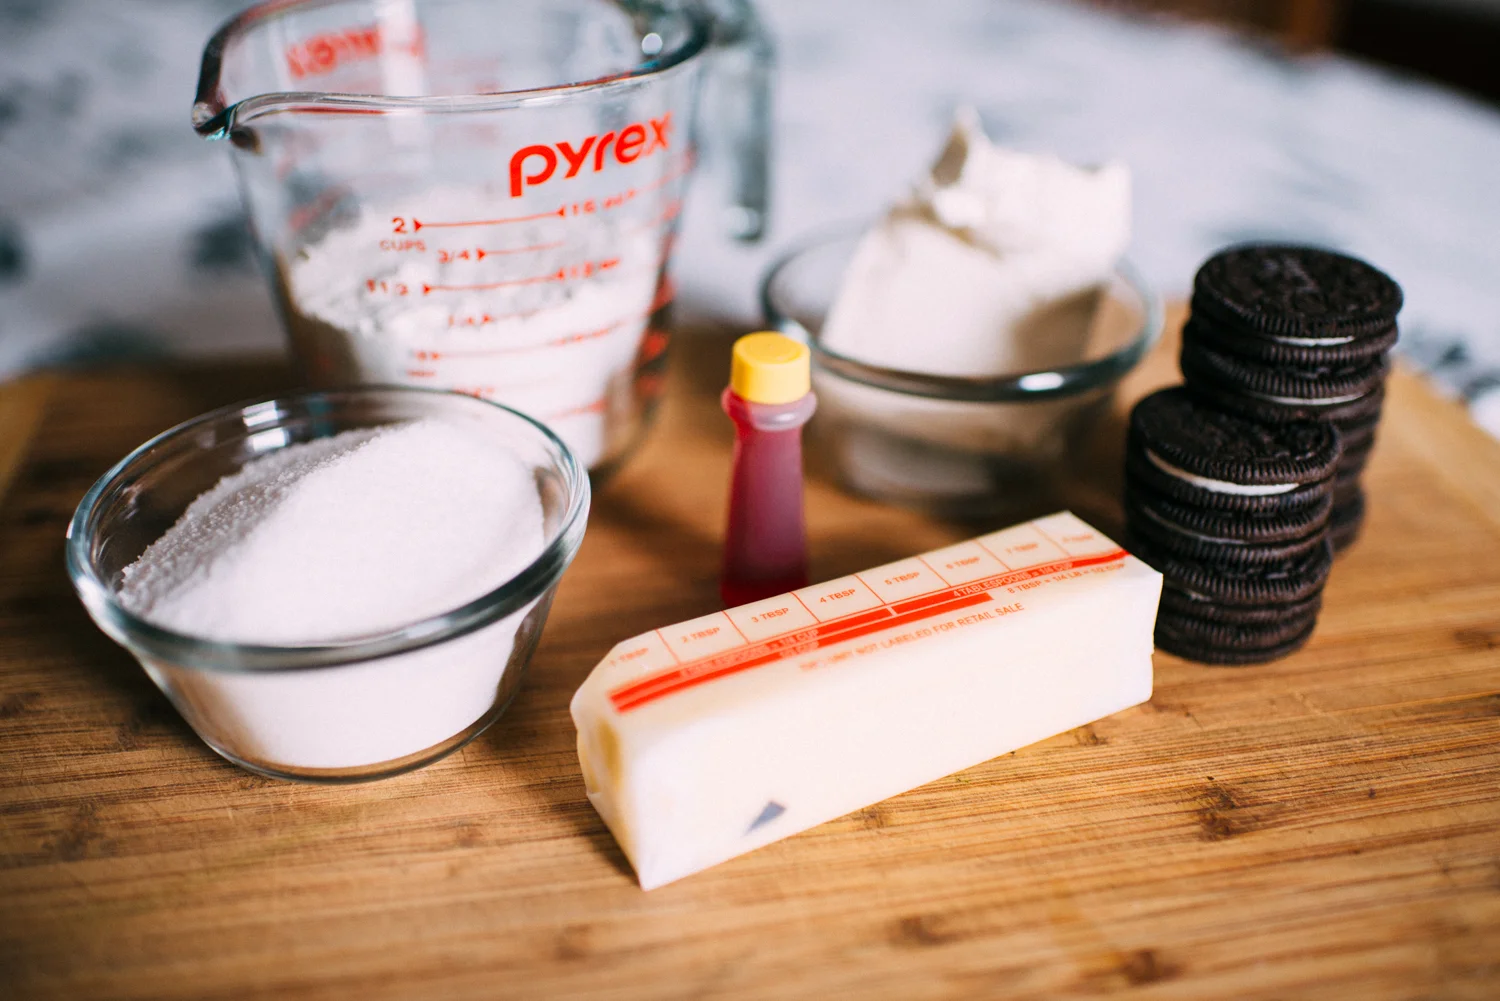
Ingredients:
4 ounces cream cheese, softened at room temperature
8 tablespoons salted butter, at room temperature [I used unsalted because that's what we buy]
3/4 cup sugar
1 cup + 2 tablespoons all-purpose flour
A few drops of red food coloring
10 Oreo cookies, broken into pieces


Directions:
In the body of a stand mixer fitted with a paddle attachment, beat cream cheese and butter until light and fluffy, scraping down the sides as needed.

Add the sugar and beat well.
Add in flour, a small bit at a time, beating in on low speed, just until incorporated. 
Add in a couple drops of red food coloring.
Fold in Oreos until evenly distributed.

Cover the bowl with plastic wrap and place in the refrigerator for at least 45 minutes, and up to 2 hours. [With two toddlers and life, my batch ended up being in the fridge for probably 2.5 hours...]

30 minutes prior to baking, preheat oven to 350 degrees (F).

Line a large baking sheet with parchment paper. Using a cookie scoop, scoop out 2 tablespoon sized balls of dough, roll them into rounds, and place them on the cookie sheet. Lightly press down on each cookie.

Place pan in the oven to bake for 10-11 minutes, or until *just golden at the edges. They will be SUPER soft when they come up and that's what you want!

Cool on the baking sheet for about 10 minutes, then very carefully transfer to a cooling rack to cool completely.

My kiddos wanted'pink milk' to drink with the cookies. They are so soft and seriously taste like little drops of Oreo© Cheesecake in your mouth. I'm not sure how dipping a cookie in milk is an innate response, but apparently it is; Reese was cracking me up! I hope you enjoy these cookies as much as me and my family did! Happy Baking :D


Perfectly Imperfect

The smell of warm bread drifted through our cozy hundred year old home the entire day. Kentucky finally had its' first snow, at least in our region, and the snowflakes softly fell. We were all staying warm, wearing comfy clothes and me in my fuzzy socks. All Sunday afternoon, I read the recipe 100 times, watched the yeast rise and fall, molded the dough into a ball and finally- finally, it was done. 

Doesn't it look beautiful? Like it would taste delicious, fresh and hot from the oven?

It wasn't. At all. It was a baking project that took me several long hours, one that required so much patience, and it had our taste buds anticipating the first bite ALL day long. I grabbed a large chunk with my eager fingers and as soon as it was in my mouth I exclaimed, "Oh NO! Yuck, no, NO!" My husband tried to be sweet about it- "Oh let's wait a while longer and see what happens (as if it would change). Maybe it'll become more dense and taste more like.... bread." It didn't.

Isn't this kind of like life? We plan for things and wish for certain events to happen. We work hard and pray for a beautiful result and then--it's nothing at all like we hoped for. My husband and I plan rigorously to provide healthy, well rounded meals for our family. Sitting around the table with one another to talk about our day is something that of course, is ideal. But after long work days, it is more of a reality that Frozen is playing for the umpteenth time and chicken nuggets is the glorious meal being served.

Perfectly imperfect. When I think that painting with two toddlers is a good idea and five seconds later am pulling my hair out at the red and blue sloshing all over the table. But they made their own masterpiece and cheered each other on the entire time.

Or the suggestion for them to get creative using Play-doh and moments later I am scraping the bits and pieces out of the cracks in our ancient floors. But their little fingers worked so hard and I watched their glowing faces each time they made another snake, or horse or human.

 I can even relate this to my current teaching career: I plan what I expect to be a freeking awesome lesson; surely the boys (I have eight), will all be engaged and thrilled to discuss the inspiring explorers Lewis and Clark. Right?! OR they'll instead get caught up on the fact that Sacajawea had a baby at seventeen ("It's not even possible to have a baby at seventeen, that's way too young," says one. "Well that was back in the day, like a LONG time ago, so it used to happen but it can't anymore," another replies). Okay sooooooooo not what I thought would be ten minutes spent in Social Studies. BUT, it did lead us to an awesome conversation about how brave and strong the female Native American was who helped Lewis and Clark reach the Pacific Ocean. The boys were awed by her courage and strength as she braved mountains and crossed waterways, all with a baby on her back. Not how I expected the lesson to go, but it turned out better.

God gifted me with the art of photography and I was blessed to discover it several years ago. But just because I am talented at snapping a good quality photo, does not mean that our life is all sunshine and roses. From the moment our kids were born, I made a very conscious decision to post what I post. I personally don't think crying photos of them are cute, that's a preference. There are a lot of other things that I would rather document. And when I spent all day making my first attempt at homemade bread, I took a lot of time and effort to take the photos that I did. When we took our first bite out of this very pretty loaf, I felt myself frown, my chest tighten up and for a second I thought, "What a waste."

The truth is, it wasn't a waste at all. Pies may be more up my alley but I've always wanted to try baking bread. Everyone says it is such hard work (PREACH!), like an art in itself; and although I longed for it to be a delicious masterpiece, the end result was a big loaf of perfect imperfections. The old floors in our house creak, 90% of the time there are toddlers running, screaming, arguing and laughing. Favorite movies are played on repeat, the corners are crowded with an abundance of toys and some days, despite how hard you try, how well you plan, you have to accept that your life is a masterpiece.


Chocolate Peanut Butter Pie

There is one delicious exception to my "I'm-not-a-sweets-girl" theory...

Every year on my Dad's birthday he wanted a chocolate peanut butter pie. A quaint little bakery in my hometown of Allegan made the perfect one and whenever Mom brought it home, I was ready; fork in hand with a glimmer in my eye because THIS, this was my favorite pie e-v-e-r. 

It's not surprising then that I craved peanut butter pie with both of my pregnancies and while I am obsessed with our local Sweet Surrender's version, going for a slice was never enough and I couldn't justify spending twenty bucks for one as often as I craved it. So praise the Lord I found THIS pie; even if it was two years ago since I had my last babe ;)

If you've followed along, you know that my 2015 Resolution was to bake a new pie each month. Well, December finally came and this would obviously be my very last pie... I had to make it count! I was at my parents home in Michigan, our 'fake Christmas' was in a few days and I knew I wanted to bake something to contribute. My genius husband was actually the one who thought of a chocolate peanut butter pie and my sister-in-law volunteered to make a grocery run with the men while I took kid duty. I asked her to look for a simple peanut butter pie recipe, and that I wanted a chocolate crust. So it's thanks to her for finding The Pioneer Woman's recipe on Food Network so that I could simply re-create and therefore EAT it. I promise you don't want to miss out on this peanut butter, chocolate goodness. Every ounce of a whipped bite is going to have you in absolute pie heaven.

Crust Ingredients:
1 package of chocolate sandwich cookies, such as Oreos
4 tablespoons butter, melted

Filling Ingredients:
1 cup creamy peanut butter
1 eight-ounce package cream cheese, softened
1 1/4 cups powdered sugar
1 eight-ounce pakage whipped topping, such as Cool Whip (thawed)

Directions for the crust:
Preheat the oven to 350 degrees. Crush the cookies until they're fine crumbs (I used a food processor). Pour the melted butter over the top and stir with a fork to combine. Press into a pie pan and bake until set, 5-7 minutes (it took my crust 10). Remove from the oven and allow to cool completely.

Directions for the filling:
Beat the peanut butter with the cream cheese until smooth. Add the powdered sugar and beat until smooth. Add in the thawed whipped topping and also beat until smooth, scraping the sides as necessary. Pour the filling into the crust and chill for at least 1 hour before serving.

And that's IT! THE easiest chocolate peanut butter pie recipe. Did we like it?! Heck to the yeah we did and my dad especially was wowed. I am fairly certain now I need to make this pie again asap because now I'm drooling.


SNICKERS© Bite Cookies

Moment of truth: I love food but sweets are generally not something I crave. HOWEVER, last year I made it a goal to bake a new pie each month, inspired by my amazingly talented Grandma. It was actually a huge success and it taught me a few things about myself:

1. that I am a huge procrastinator-often I remembered the last week of the month (or the last DAY) and frantically had to plan my ingredients.

2. baking for me is kind of like free therapy-our kitchen isn't gigantic, there's hardly any natural light and if any of the four humans in our house enter it, I find myself tripping, a lot... but it has all that I need to get the job done. Something about following a recipe and measuring out quantities, planning as I go how I want to style the finished product for a pretty photo; it's comforting.

3. i'm actually pretty good at it- I said that I'm not a huge sweets person and truth be told, neither is my family. Sure my kids will ask for some candy when we have it, but more pies last year were wasted then I care to admit. My kids weren't huge fans, and they're at that stage where if a food looks different, they would rather take one bite (out of obedience) and skip the rest. I am of course grateful that they don't crave junk, but I am hoping to find a recipe that they crave someday soon. (I drool at the thought of my mom's m&m brownies, her molasses cookies, chocolate peanut butter balls, and blueberry pies. Whenever I think of them, my mind instantly goes back to sweet elementary school memories where I shared these goodies with my friends!)

So here we are, 2016. I promise my goals go beyond baking, but I'll save that for another post. So TA DAAAAA! One new cookie recipe a month is what I will be documenting this year (#ashleysyearofpies on Instagram if you care to follow along!) I had some packaged Snickers© Bites in my pantry and decided my first cookie recipe would be just this.

Ingredients:
1 cup (2 sticks) salted butter (and I had mine at room temperature)
2/3 cup light brown sugar
2/3 cup granulated sugar
1 egg
1 1/2 tsp vanilla extract (I had to use off brand/generic vanilla flavoring and the cookies still turned out delicious, so I can't even imagine the flavor when REAL extract can be used!)
2 cups all purpose flour
1 1/4 tsp baking soda
a pinch of salt
1 bag of Snickers© Bites

Directions:
Preheat oven to 350 degrees (I followed this step later in the process, instead of turning it on only to wait for the cookie dough to chill).
In a large bowl, cream the butter and both sugars until well blended. Add the extract and egg slowly to combine.
In a separate bowl, mix the flour, baking soda and salt together. Slowly add the butter mixture and stir until combined. Chill the dough for 1 hour (confession: I actually chilled it for 45 minutes because I was getting too impatient).
Drop dough by rounded tablespoons onto a lightly greased tray, about 2 inches apart
Bake for 8-10 minutes for chewy cookies or 12-14 for crispy (I took mine out after 7 minutes and let them finish cooking on the hot tray)
*You can either press the Bites into the cookies before loading them into the oven, or you can put it on when they come out--I actually did half and half just to see if I had a preference. I didn't, both ways are delicious :) 

Both of my kids yelled, "COOKIES!" when they heard the oven timer go off. I was all excited thinking they would actually love one of their Mama's desserts but guess what they did....they just ate the SNICKERS© bites OFF of the cookies and set the actual cookie to the side. And then said, "More?? More cookies?" Ummmm.... guess we'll try again?! I will say that my husband grabbed one with a fresh cup of coffee and reassured that they are indeed delish.