food

Homemade Baked Mac n' Cheese, Yes, Please!

Ashley Glass Blog

Reese is definitely a mac n’ cheese gal but let’s face it…who doesn’t love it? Asa has made his from scratch for a long time and it’s a huge hit at family functions and get togethers, but for this dish he found a new recipe that is absolutely to die for!

We worked with Kroger and the campaign was for a Southern Comfort meal. This dinner hit the SPOT for that comfort food deliciousness, so much so that I may have eaten directly out of the tray once I cleaned my plate. Oh my word, Ashley… that’s embarrassing.

Okay, want the recipe?? I expect this to be on your family’s weekend menu and I want to know how you like it! This dish was inspired by Mom On Timeout’s blog post, so I cannot take the credit, she totally deserves it all! :)

PS: we were in an airbnb when we made this dish, as our home was still being fixed up. Hence the reason for the disposable tray and a room you may not recognize at the bottom of this post ;)

Ingredients:

  • 16 oz elbow macaroni, cooked (or other tubular pasta)

  • 1 tbsp extra virgin olive oil

  • 6 tbsp unsalted butter

  • 1/3 cup all purpose flour

  • 3 cups whole milk

  • 1 cup heavy whipping cream

  • 4 cups sharp cheddar cheese shredded

  • 2 cups Gruyere cheese shredded

  • salt and pepper to taste

  • 1 1/2 cups panko crumbs

  • 4 tbsp butter melted

  • 1/2 cup Parmesan cheese shredded

  • 1/4 tsp smoked paprika (or regular paprika)

Instructions:

  • Preheat oven to 350F. Lightly grease a large 3 qt or 4 qt baking dish and set aside.Combine shredded cheeses in a large bowl and set aside.

  • Cook the pasta one minute shy of al dente according to the package instructions. Remove from heat, drain, and place in a large bowl.

  • Drizzle pasta with olive oil and stir to coat pasta. Set aside to cool while preparing cheese sauce.

  • Melt butter in a deep saucepan, dutch oven, or stock pot.

  • Whisk in flour over medium heat and continue whisking for about 1 minute until bubbly and golden.

  • Gradually whisk in the milk and heavy cream until nice and smooth. Continue whisking until you see bubbles on the surface and then continue cooking and whisking for another 2 minutes. Whisk in salt and pepper.

  • Add two cups of shredded cheese and whisk until smooth. Add another two cups of shredded cheese and continue whisking until creamy and smooth. Sauce should be nice and thick.

  • Stir in the cooled pasta until combined and pasta is fully coated with the cheese sauce.

  • Pour half of the mac and cheese into the prepared baking dish. Top with remaining 2 cups of shredded cheese and then the remaining mac and cheese.

  • In a small bowl, combine panko crumbs, Parmesan cheese, melted butter and paprika. Sprinkle over the top and bake until bubbly and golden brown, about 30 minutes. Serve immediately.

Ashley Glass Blog

A few tips from her blog that we also can’t emphasize enough:

Use block cheese and shred, do NOT buy the pre-shredded cheese. Yes, shredded cheese is so easy and serves so many purposes in homemade meals…but NOT for this! It is coated and will not melt properly. You need to shred it yourself for the best result.

Also—cook your pasta to slightly less than al dente, about one minute shy is great. The reason is that this is baked mac and cheese so the pasta will continue to cook in the homemade cheese sauce in the oven. Nobody likes soggy macaroni!

This mac and cheese recipe starts with a roux. The roux is crucial for getting the creamiest cheese sauce ever! Here is what you need to look for:

  • The roux (equal parts butter and flour) is whisked together until bubbly and golden.

  • Whisk in cold milk – not warm – to prevent the flour from clumping.

  • Cook the roux until you see bubbles on the surface and then continue cooking for an additional 2 minutes before adding the cheese.

For an extra bang of flavor, add Parmesan to the Panko topping – cheese upon cheese upon cheese upon cheese. Always and forever, amen. What are you waiting for? Order your groceries, add these items, and get cooking! Comment here when you’ve tried it, I wanna know what you’d rate this!

Ashley Glass Blog

A Springtime Cake That Tastes like Sunshine

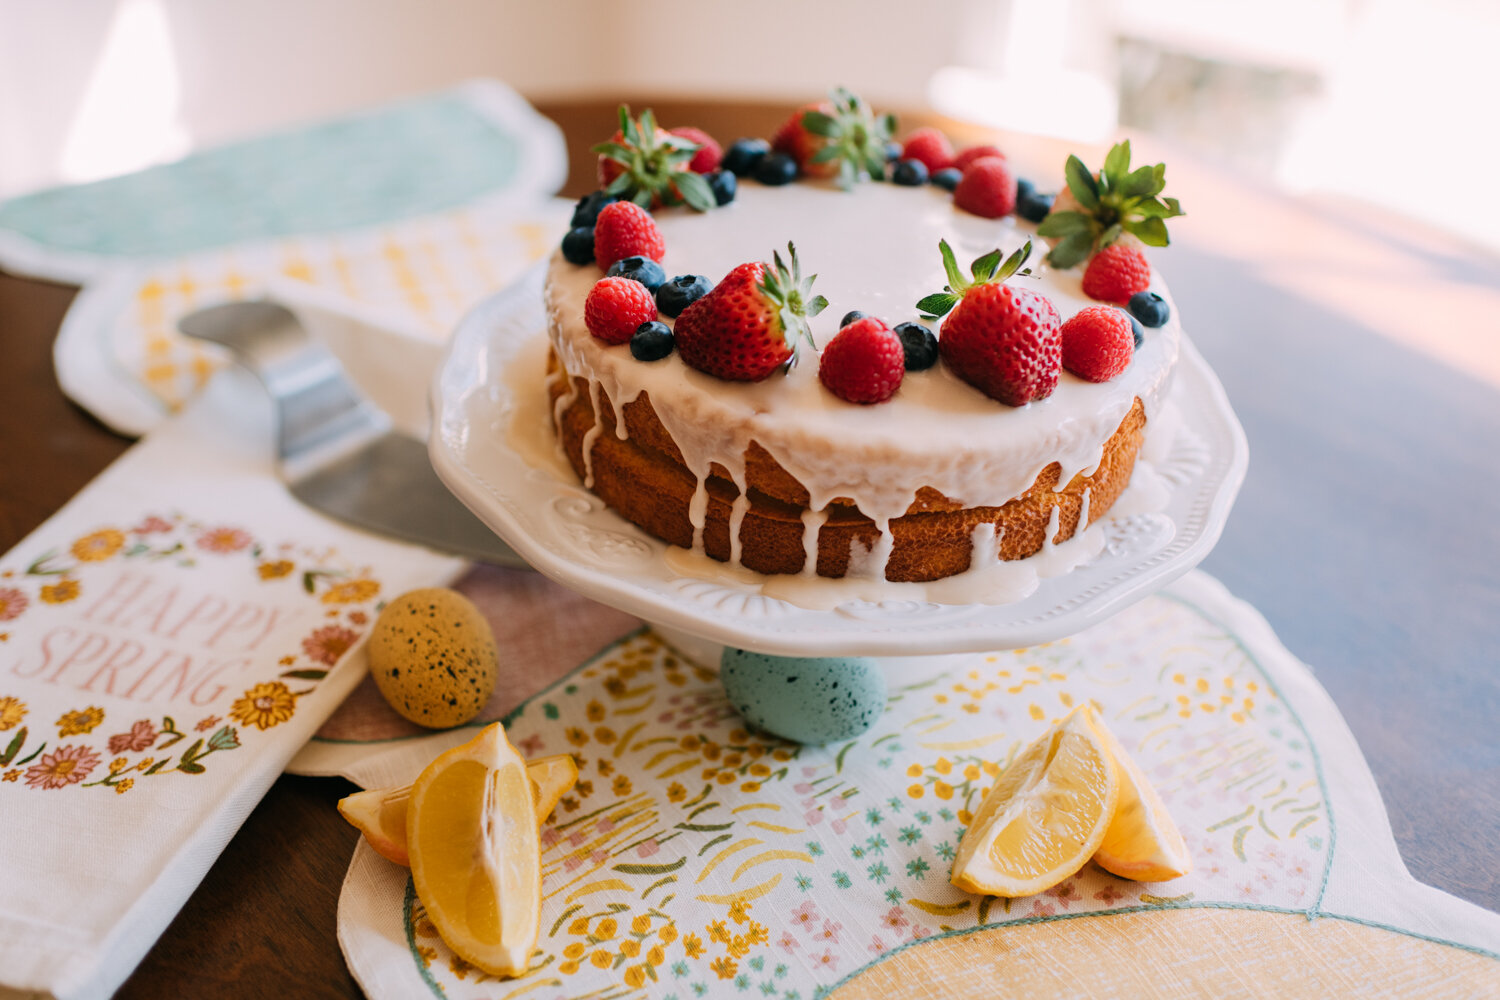
It’s a first for us to make a gluten AND dairy free cake, and guess what, it was a HUGE success! I did a paid sponsorship with a plant based butter company who wanted an Easter themed recipe; our wheels were spinning and Pinterest came to the rescue (as usual) as we stumbled upon One Lovely Life’s blog and therefore, THIS recipe! This is a bright and tangy lemon cake that not only photographs beautifully, it tastes delectable. Want to give it a whirl? Here’s how:

FOR THE LEMON CAKE:

  • 1/2 cup milk (We used unsweetened almond milk)

  • 3 Tbsp lemon juice

  • 3/4 cup sugar (you can use organic cane sugar, we used regular)

  • 2 Tbsp lemon zest (about 2 lemons’ worth)

  • 1/2 cup vegan butter (that’s where my sponsorship came in, we used Flora Plant Butter)

  • 3 eggs

  • 1/2 tsp vanilla extract

  • 1 3/4 cup gluten free all purpose flour baking blend (like Bob’s Red Mill 1-to-1 Baking Flour)

  • 1 1/2 tsp baking powder

  • 1/4 tsp baking soda

  • 1/2 tsp salt

FOR THE LEMON-HONEY SYRUP:

  • 1 Tbsp honey

  • 2 Tbsp lemon juice

FOR THE LEMON GLAZE:

  • 1 Tbsp lemon juice

  • 2 Tbsp milk (We used almond milk)

  • 1/2 tsp vanilla

  • 2 cups powdered sugar, sifted

FOR THE CAKE (recipe from One Lovely Life)

  1. Preheat oven to 350 degrees. Grease a 9″ cake pan with spray oil and line the bottom with a parchment paper circle*

  2. In a liquid measuring cup (or a small bowl), combine lemon juice and milk. Let sit for about 5 minutes.

  3. While the lemon juice and milk is sitting, rub lemon zest into the sugar in a large bowl. This gets the lemon oil into the sugar and distributes the flavor really well.

  4. Add milk mixture, butter (or avocado oil), eggs, and vanilla. Whisk until well combined.

  5. In a medium bowl, stir together flour blend, baking powder, baking soda, and salt. Stir the dry ingredients into the wet ingredients and mix until just combined. (Or you can simply sprinkle the dry ingredients over the wet before stirring)

  6. Pour into your prepared 9″ cake pan.

  7. Bake at 350 degrees F for 25-30 minutes, or until a toothpick inserted in the center comes out clean.

  8. Place on a cooling rack in the pan for 10 minutes to cool slightly before turning out onto a plate.

  9. While the cake cools slightly, mix up your lemon honey syrup (see below)

  10. After 10 minutes cooling in the pan, turn the cake out onto a plate or cake stand and brush with the still-warm cake with lemon honey syrup.

  11. When the cake has cooled completely, top with glaze.

FOR THE LEMON-HONEY SYRUP:

  1. Stir together lemon juice and honey. Brush over the cake when it’s still quite warm (as soon after removing the cake from the cake pan as you can). Let cake brushed with syrup cool completely before adding the glaze.

FOR THE LEMON GLAZE:

  1. Sift powdered sugar into a large bowl. Add lemon juice, milk, and vanilla. Whisk or beat until smooth. (Ideally, you want the glaze to be opaque and to hold its shape when it drips down the sides of the cake. If yours is too thin, add more powdered sugar 1 Tbsp at a time. If it’s too thick, add more milk 1 teaspoon at a time until you reach the right consistency.)

  2. Pour glaze over your cooled cake and gently spread it toward the edges. Let some of the glaze run down the sides. Let set completely before cutting and serving.

NUTRITION FACTS: SERVES 12
CALORIES 301

We don’t make a lot of gluten free recipes (like…never….) BUT Bob’s Red Mill 1-to-1 Baking Flour is a cup-for-cup substitute for white flour in recipes like this, and it is still a light, fluffy result very similar to traditional flour.

You could turn this recipe into cupcakes (how cute would that be??) and the fruit on top is totally your choice!! We love blueberries, strawberries and raspberries so we went with that!

Though we don’t eat a ton of desserts or sweets, lemon is definitely always a win in our household. Reese especially with this cake has loved it and has eaten a small slice the past few nights after her dinner. If you make it, tell me in the comments or post a favorite cake recipe of your own!

Grab and Go Power Snack

ashley glass blog

I’ve heard such great things about ‘power bites’ but have never made them until now! I did a quick search on Pinterest actually, when we were going to spend a day on the boat. I was looking for an easy and homemade snack that I thought everyone could enjoy—and these were definitely a hit!

I’m sure there are so many ways to make these, but this recipe was from Like Mother Like Daughter’s blog page (and I believe she found it from another blogger too.) I have made these two times, the second time I just eye balled the ingredients (that’s how simple it is to make!) There are no eggs or flour and no added white sugar—sure, there are some m&m’s and mini chocolate chips, but still these are so much healthier than your average cookie. And the protein is a bonus for me, because I always need more of it :)

ashley glass blog

Here’s the easy peasy way to whip these up:
Add 1 1/4 cup of old fashioned oats, 1/2 cup of creamy peanut butter, 1/4 cup of honey, and 1/3 cup of both mini m&m’s and mini chocolate chips into a bowl and stir it all up until combined. Then roll the mixture into small balls (I used a cookie dough scoop, about 1 to 1.5 inches in size.) Washing your hands in between to prevent all of it from sticking too much to them will help! Then place the bites onto a cookie sheet lined with parchment paper and let it set in the fridge until solid/chilled. You can store these in an airtight container or a ziplock bag (which is what I do) and I leave ours in the fridge to stay nice and chilly.

The kids love them, I love them, and they take maybe 5 minutes to make so this is definitely a winning recipe in my book!

According to her website here are the nutrients: Calories: 102kcal | Carbohydrates: 13g | Protein: 3g | Fat: 5g | Saturated Fat: 2g | Cholesterol: 1mg | Sodium: 34mg | Potassium: 62mg | Fiber: 1g | Sugar: 8g | Vitamin A: 14IU | Calcium: 13mg | Iron: 1mg

I would LOVE to hear if you make these and what YOU think! Comment on this blog post or tag me in your Instagram stories if you share!

HAPPY SNACKING!
xx

Easy and Healthy Mediterranean Lamb Bowls

ashley glass blog

When you think of a summer dinner, what sounds GOOD? For me I tend to lean towards fresh, light, and usually on the healthier side. There is something about these HOT and humid Kentucky days that make my taste buds crave less calories.

We recently partnered with Kroger to show how they support our local brands, and while this blog post is NOT sponsored, it is thanks to them that we found and created this dish and I wanted to share! I haven’t eaten a lot of lamb in my lifetime, but that’s what we went with when working with Kroger, to help promote Freedom Run Farm. Let me tell you, this lamb was DELICIOUS!! We looked up recipe ideas for working with ground lamb and we were led to Fox and Briar’s blog. She introduced us to this INCREDIBLE Mediterranean Lamb Bowl and I had to share with YOU.

ashley glass blog

For the Spiced Ground Lamb:

  • 1 pound ground lamb

  • 1 tablespoon olive oil

  • 1/4 cup finely diced onion

  • 4 cloves garlic, finely minced

  • 1 teaspoon paprika

  • 1 teaspoon allspice

  • 1/2 teaspoon red pepper flakes

  • 1/4 teaspoon ground ginger

  • salt to taste

  • pepper to taste

  • 1/4 cup fresh mint, chopped plus more for garnish

  • 1/4 cup flat leaf parsley, chopped + a little more for garnish

ashley glass blog

Ingredients for the Bowls:

To Make The Spiced Ground Lamb:
Heat a large sauté pan over medium heat and add the olive oil. When the oil is hot, add your onions and garlic.  Sauté all of this for five minutes, until starting to soften and then add the ground lamb.  Brown the lamb until cooked through. Add paprika, allspice, red pepper flakes, ginger, salt and pepper.  Mix until fully combined, cook for one or two minutes. Remove from heat and stir in fresh herbs. To assemble the bowls, layer the Turmeric Rice, top with some of the spiced lamb, tomatoes, cucumbers, hummus, and feta. Sprinkle it with fresh mint and parsley! (It’s DELICIOUS!)

ashley glass blog

I think Asa has made this almost every week since discovering this recipe. He put his own little touches on it, but overall this comes from Fox and Briar. Make this for your next date night, family night, or when you have some friends over. The vibrant Turmeric Rice with the veggies and cheese and pita is SUCH a fun and refreshing meal. We bought some hummus and spinach dip to use on the pita’s, and every bite was filled with so much YUM! Let me know if you make it, I want to hear your spin on it and how/if you enjoyed it as much as we do.

Happy Summer dining, Friends! Stay safe stay well!

xx